Monday, March 18, 2013

Progress

Progress on the crafting trailer was halted for a couple of weeks thanks to Winter Storm Q. We couldn't get to the trailer without tromping through a foot of snow. The kids ending up having 4 snow days. A 6 day weekend! That's pretty much unheard of in Kansas.


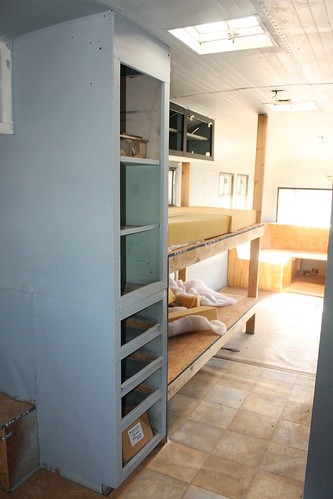
Before the snowstorm hit, I did get a start on a big project. We're creating a reading nook in the back end of the trailer, and I wanted to do a special treatment to the wall and ceiling back there. I love looking at the fabric in vintage patchwork quilts. Real patchwork quilts. The kind that weren't all matchy-matchy, because they used whatever scraps were laying around to make them. I thought I'd create something similar on my walls using old book pages. Roger reminded me that I had a set of 1974 Wold Book Encyclopedias in storage. I think we paid 50 cents for them at an auction last summer. Perfect decoupage material!

I razored out a bunch of encyclopedia pages and got to work with my sponge brush and Mod Podge.


I started at one edge and followed the curve of the wall up to the center of the ceiling. Then I went to the other side of the trailer and did the same until they met.


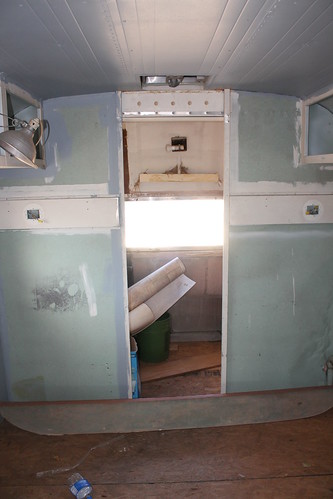
Here's what I had at the end of the first day. You can see that there were a number of odd textures and patches and holes that needed to be covered. The thing I love about this treatment is that it really hides all those flaws.


Finally got in there about a week ago and was able to finish it up. I am absolutely thrilled with how this turned out. I was afraid it might be too stripey or too messy or too something, but it's perfect. However, I do still plan to add a few spots of color to it.


These are a few of my options. I'm picturing them randomly placed over the black and white pages to add little pops of vintage color.


Roger managed to get a little painting done, too. The ceiling and front wall are now this pretty shade of aqua. I love this color. I hate picking paint, because all you get to see is that little tiny square of color, and I can't ever imagine it enlarged onto an entire wall. When picking this one, I controlled my usual impulse to go too dark, and I'm very happy with the results.

Wiring is the next step. Our completely awesome, sort of retired electrician has been helping us out. I'm excited, because once all that boring wiring is done, the walls start going up. And then I'll feel like I'm really seeing results!

Tuesday, February 5, 2013

Progress

Roger has been busy, and I am impatiently waiting for the day when it's all done. It's hard work waiting for the "boring" stuff to be done, so that I can do the "fun" stuff. But, I'm glad I have a husband who is handy and smart and thinks about the details. The first step was ripping out all the stuff we didn't want.

The weird sitting area at the front is gone. We will be putting a built in desk at that end. Right now, there is a folding table to hold Roger's tools and supplies.


We removed the standing shelves and the shelves over the "kitchen" area. The only original overhead bins we left are at the back.


Now, we have a crumpled mess of aluminum behind our house. I think Roger is hanging on to them in case he needs to patch anything.


After some research, we became less worried about removing things and took out the back wall that originally divided the bathroom from the rest of the trailer. Roger will be putting up a new wall back there to create the reading nook.


Found a rotten spot in the back. It would appear that at sometime in its history, the trailer was in an accident. The rear driver's side is quite beat up, and that was causing moisture to seep in and rot the floor.


It's been patched and replaced, so now it looks like it did before we found the hole!


Our first wall is framed! Progress at last! The plan is to build walls in front of the original aluminum walls so that we can run wiring without having to open the original walls and then re-rivet them back into place. We'll also be able to add an additional layer of insulation.


One more thing! We bought an electric fireplace to go in this spot. Hurray for sales at Lowes! This is the model we chose. Now, we need to find a window air conditioning unit so I'll be set for year round crafting!

Friday, January 25, 2013

Three's a Collection


I didn't set out to collect toy toasters. I don't think anyone sets out to collect toy toasters; it just happens. One day, I was at the flea market and saw the toaster with the rooster. Plaid is fun and roosters are fun. I brought it home and it sat in my kitchen for about a year.

A few weeks ago, I spotted the blue toaster at the same flea market. It's in crazy good shape and such a great color. It had to come home with me.

Today, Roger was restocking our booth at the antique mall and saw the red toaster in a display. Red is my color, you know, so he brought it home, too.

And, that, my friends, is how you start a collection.

See more thrifty finds at Young Heart's weekly link-up!

Tuesday, January 15, 2013

New BIG Project

Wow!! It's been over 2 months since I've blogged! I need to do better! But, we're not going to call that a resolution, because I never complete those.

The other day, I sent Roger a picture of a vintage trailer with a chandelier in it. He responded that a chandelier was completely impractical in a camper and maybe what we needed was a second trailer as a playhouse. Well, I didn't have any problem getting behind that idea!

On Saturday, we convinced my brother to haul this home for us. He's pretty easy to convince. Our bizarre requests don't even phase him anymore. Like I told Roger, when you begin your marriage by buying a church to live in, nothing else you do will surprise your family.


As best we can tell, this is a late 50s Streamline travel trailer. Possibly an Emperor model. When your serial number is only 4 digits long, you know it's old.

This trailer isn't going anywhere. It's going to be my craft space. I can hardly wait. In fact, I'm dying for Roger to get done with the boring stuff, so I can do the FUN stuff. He thinks I'm going to spend the summer polishing the exterior. He's so cute.

Here's a quick tour of the inside.


Someone has started a seating area in the front of the trailer. This is all coming out. My craft table will take center stage here.


The kitchenette would have been to the right of this built in storage cupboard. The sink and countertop have been long since removed. There's a set of rough bunkbeds in its place. Those are going away to make room for a waist high countertop where I can cut fabric without having to bend over.

Across the way is this big metal "thing". A fullsize range would have gone in the open space. The rest of it is two closets. The closets will remain, but I'm hoping we can remove the metal whatever-it-is up to the closets.


There is a nice open area at the back of the trailer which was the "bedroom". There would have been a twin bed on each side of the middle aisle. A bathroom would have been through that back doorway. All of the fixtures have been removed from the bathroom, so we are going to convert that to a nice little reading nook. Kind of like a window seat.

So much work to do! So much planning! I've already got a car seat full of paint chips and a pinterest board dedicated to ideas and inspiration for my craft trailer.

Stay tuned!

Sunday, November 4, 2012

Recent Finds

Been a while since I posted, but that doesn't mean we haven't been adding to our stash! So, many things, and I've been trying to clean up the house a bit, too. Not easy when you've got a lot of vintage treasures sitting around.


I have a cousin who is an avid garage saler and has a great eye for vintage stuff. She brings me treasures now and then. Today, she brought me this fantastic Samsonite travel case. I have never had a round one. She also gave me this avocado green Disc-Go-Case for holding all my 45s. (I don't have any 45s, other than the ones that came with the case.) I'm just thrilled because it says, "Disc-Go-Case" on the top!


My mom and I spent the morning at an auction a few weeks ago. I fell in love with this hatbox the minute I saw it. The orange, green and black masquerade graphics are so unique! I think this would make a great Halloween display case. The lid is in less than stellar condition, and I might have overpaid, but I couldn't help myself!


These salt and pepper shakers won me over with their creepy coolness. They're Humpty Dumpty twins! (Still a bit dirty, but nothing that won't clean up!)


Both of these satin aprons are from Ft. George G. Meade in Maryland. I'd never seen souvenir aprons like these before. They definitely need a good steaming, but I have high hopes for both of them!


A sweetheart pillow cover from Camp Wood, TX. I believe it World War II era.


Another pillow cover. This one is a souvenir cover from New Mexico. I liked the cowboy and Indian imagery.


And, three more souvenir pillow covers from Washington, DC, Los Angeles and New York. I think one of these will be kept for the camper. Just have to choose which one!

Wednesday, September 19, 2012

Camper Party!!

This week started out rough. Lil Kay was in trouble at school, he was in trouble at home. There was much yelling and plenty of tears. We were all tense and on edge. I felt like the world's worst mom. I knew we needed to turn this around. And fast.

It hit me part way through yesterday afternoon - Camper Party!! So, after work, I went to WalMart, got some supplies and picked up some Subway sandwiches. When I got home, I gathered the rest of my supplies and we headed out to the camper!


After eating our sandwiches, we covered the table with a vinyl tablecloth and broke out the crafting supplies. It's September. I figured it's a good time to start Halloween crafting. Besides, kids love glue! And ModPodge is the king of glue! (Okay, I love glue, too!)


Love the way our tissue paper covered jar pumpkins turned out! We also made some mummy jars by wrapping guaze around the jars and putting on wiggly eyes. (I didn't get pictures. Mostly, because I had to help a lot more with that project.)


Did a little reading on the bed/couch. In fact, after we put Boo to bed, Lil Kay and I snuck back out to the camper to do some homework and more reading. It's so peaceful in the camper!


And, we ended the evening with cupcakes leftover from Boo's birthday party on Sunday. And, that reminds me. I forgot to clean Lil Kay's stained face this morning. He went to school with a blue mustache and beard. Swell.

This was such a good evening. I spent time with the kids without any distractions and we had a great time. I'm very excited about this camper. I'm hoping it will become like an extra room in our house. A sanctuary of sorts. But, it needs more pillows....

Sunday, September 9, 2012

Auction Highlights


Small auction on Saturday. There weren't a lot of really fantastic items, but enough to keep us interested. I spotted this orange carafe early on. The marking on the bottom is almost impossible to make out, but after some research, I found that it is a Metlox Pottery piece. I just loved the color and shape.


I can't pass up a deck of old playing cards if the graphics on them are good. Saturday, we scored an entire box full! These are all just fantastic. My favorites are the Mixies and Tree Spotter decks, but all of them have great graphics. The Go Fish deck is fish shaped with solid colored faces.


This pottery item came along with the Metlox piece, but I have no idea what it is or who made it. I love the black on orange design, and I'm always drawn to items with a fish motif.


These are the only markings on the piece. If anyone has any ideas, I would love to hear them!

We are currently working ourselves into a frenzy getting ready for the Red Barn Outdoor Market on Saturday. If you are in the south central Kansas area, you should really try to attend. I know there is a lot going on this weekend, but this event is so unique and fun!

Check out more cool stuff at the Thriftosaurus Link Up!!

More vintage goodness at Vintage Thingie Thursday!